
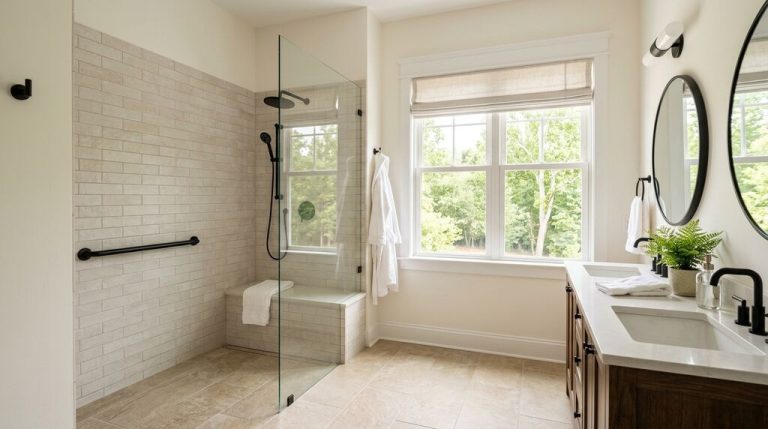
What you need to know now about an aging in place bathroom remodel:
- An aging in place bathroom remodel combines safety features like grab bars and curbless showers with design choices that still look intentional, not clinical.
- Grab bars, non-slip flooring, and curbless showers are the three features homeowners add most often, and they can be built into a remodel you were already planning.
- Standard doorway widths, shower entries, and fixture placement all need to change for real accessibility. A grab bar bolted onto an existing layout isn’t enough on its own.
- Planning ahead, even before anyone in the house needs these features, costs far less than retrofitting later.
Keep reading for the specific placement rules, material choices, and layout numbers that separate a safe bathroom from one that only looks safe on a spec sheet.
Cost ranges in this guide reflect 2025-2026 industry data. Your exact numbers will depend on your bathroom’s current layout, your fixture choices, and whether structural changes are needed. Get a written, itemized quote before finalizing your budget.
What Is an Aging in Place Bathroom Remodel?
An aging in place bathroom remodel modifies an existing bathroom so someone can use it safely and independently as their mobility, balance, or strength changes over time. It blends functional changes like grab bars and wider doorways with design choices that keep the room feeling like a bathroom, not a clinic.
A well-planned bathroom remodel gets easier to execute when it’s not an emergency retrofit. See how BoCo Modern approaches bathroom design and renovation from the first conversation. Explore Our Bathroom Services →
More than two-thirds of homeowners (68%) now factor special needs into their bathroom renovations, according to the 2025 U.S. Houzz Bathroom Trends Study. Aging household members are the top reason, cited by 41% for current needs and 49% for future ones.
That second number matters. Nearly half of the people addressing this today aren’t solving a problem they have right now. They’re solving one they can see coming.
We hear a version of the same request constantly in the Triangle: someone wants a bathroom that works for a parent moving in, or for themselves ten years from now, without it looking like a hospital room got dropped into their house.
Why Do Falls Happen in the Bathroom, and How Do You Prevent Them?
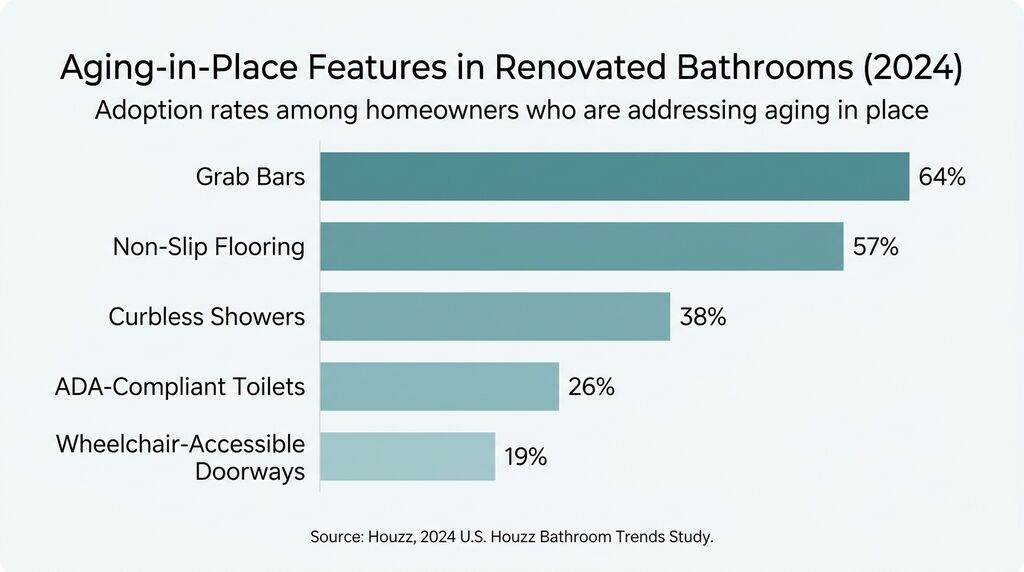
More than one in four adults 65 and older falls each year, according to the CDC, and falling once roughly doubles the odds of falling again. The bathroom isn’t the overwhelming cause some articles claim, but its combination of hard surfaces, standing water, and tight turning space makes it one of the most consequential rooms to get wrong.
The prevention side is mostly about removing single points of failure. A wet tile floor with nothing to grab onto is one bad step away from an injury. The same floor with a grab bar within reach and a non-slip surface underfoot removes both risk factors at once.
The Highest-Impact Safety Changes
- Grab bars near the toilet and inside the shower, mounted into blocking, not just drywall anchors
- A curbless or low-curb shower entry that removes the trip point most people don’t think about until they catch a foot on it
- Non-slip flooring rated for wet conditions, not just marketed as “textured”
- A comfort-height toilet that reduces strain on knees and hips during sit-to-stand transitions
- Better lighting, especially inside the shower and around the toilet, where shadows hide edges and thresholds
What Are the Most Important Grab Bar Placement Rules?
Grab bars belong near the toilet and inside the shower, mounted 33 to 36 inches above the floor into solid blocking, not drywall alone. A towel bar is not a substitute. Towel bars aren’t rated to support a person’s full weight during a fall or a transfer, and relying on one is a common and dangerous mistake.
Placement matters as much as height. A grab bar next to the toilet should sit within easy reach of someone sitting down or standing up, usually mounted on the wall beside the fixture rather than behind it. Inside the shower, one bar at bench height combined with a vertical bar near the entry covers both sitting support and standing balance.
Where Blocking Should Go, Even If You’re Not Installing Bars Yet
- Beside the toilet, on the wall a seated person would naturally reach toward
- Inside the shower, at both a low bench-height position and a higher standing-height position
- At the shower entry, for anyone who needs support stepping over a threshold or through a curbless opening
Adding blocking during a remodel costs very little. Adding it after the walls are already finished means cutting into new tile or drywall to do the same job.
Curbless and Low-Curb Showers: What’s Actually Involved?
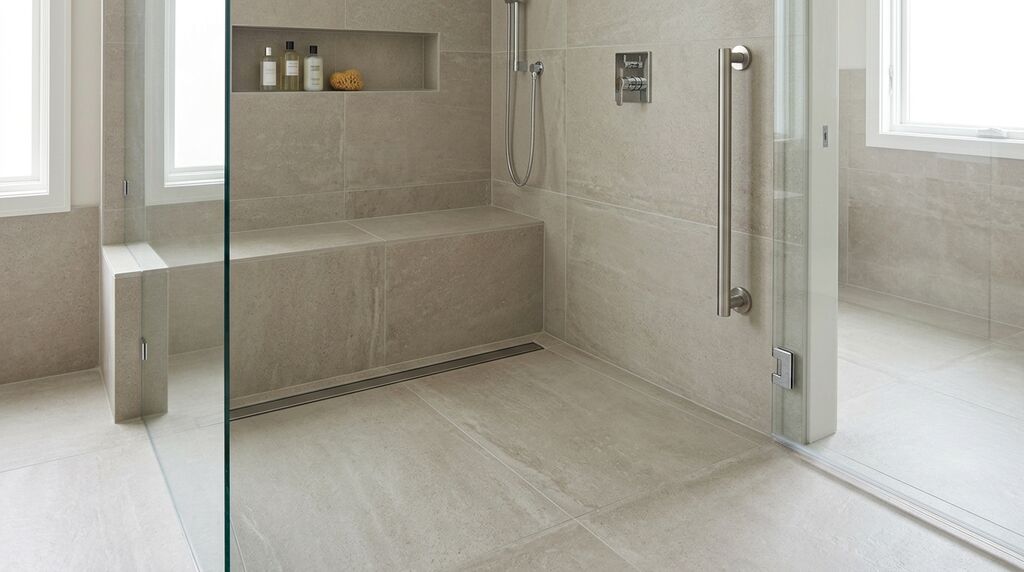
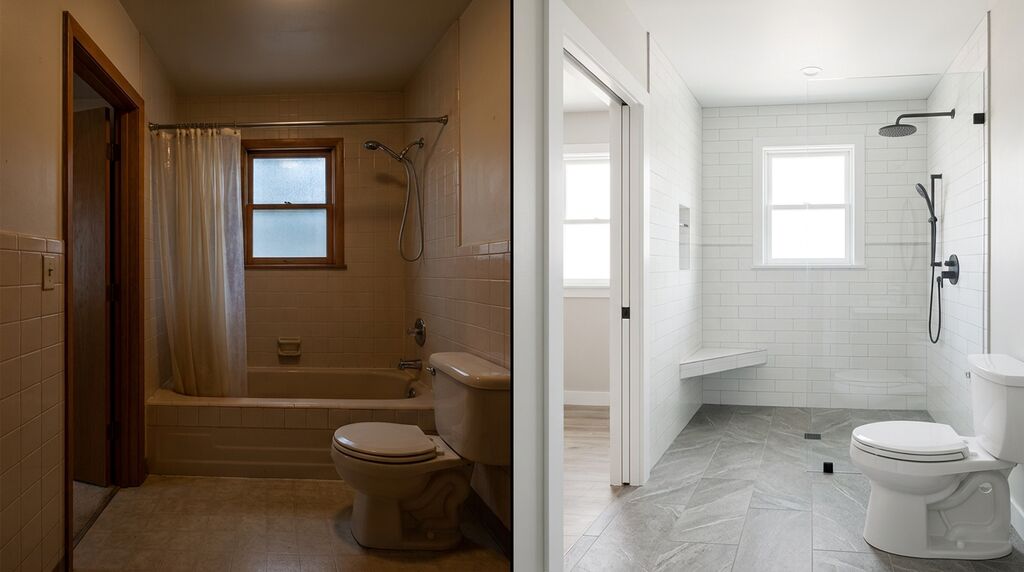
A curbless shower removes the raised threshold at the shower entry entirely, while a low-curb shower keeps a small lip, usually under an inch. Both require the subfloor to be modified so water drains properly without a curb to contain it. This is a structural decision, not a tile choice.
Low-curb entries appeared in 52% of bathroom upgrades and fully curbless entries in 28%, according to Houzz’s most recent bathroom trends data. That’s a meaningful share of renovations choosing this feature for reasons beyond accessibility alone. It reads as clean, modern design as often as it reads as a safety measure.
Getting a curbless shower right usually means:
- Recessing the subfloor slightly so the shower floor sits flush with the bathroom floor
- Installing a linear drain along one wall instead of a center drain, which makes the flush transition possible
- Sloping the shower floor correctly so water doesn’t creep past the entry into the rest of the room
This is not a weekend tile swap. It’s a plumbing and framing project wearing a design project’s clothes.
Cost is the first question most homeowners ask once they’ve decided on a curbless entry. See real 2026 numbers for walk-in shower conversions in the Triangle. Read: Walk-In Shower Remodel Cost →
What Bathroom Materials Are Easiest to Clean and Safest for Aging in Place?
Solid surface materials like acrylic or cultured marble shower pans clean faster and safer than tiled pans, since fewer grout lines mean fewer places for grime and mildew to collect. When tile is the right look for a project, large-format tile achieves a similar effect by cutting the total grout footprint way down.
Two goals usually drive this decision at the same time: making the bathroom safer and making it less work to maintain. Those goals turn out to overlap more than people expect.
Material Choices Worth the Upgrade
- Solid surface shower walls and pans instead of tile, for fewer seams and less scrubbing
- Textured, slip-rated flooring rather than glossy tile, which gets dangerous the moment it’s wet
- Sealed glass shower doors with a baked-in coating rather than a topical one, since topical coatings wear off and stop working
- Lever-style faucet handles instead of round knobs, which are easier to operate with limited grip strength
- A handheld showerhead on a slide bar, useful for both seated bathing and rinsing down the shower afterward
None of these choices look like “accessibility features” on a showroom floor. They look like good design, which is exactly the point.
Weighing solid surface against tile, faucet finishes, and a dozen other material decisions can turn into a project of its own. BoCo Select bundles vetted, high-quality bathroom finishes into ready-to-choose packages, so material decisions don’t stall your timeline. Explore BoCo Select Bathrooms →
How Much Space Do You Need for an Accessible Bathroom?
An accessible bathroom needs a minimum 32-inch clear doorway, a 60-inch turning radius somewhere in the room, and grab bars mounted 33 to 36 inches above the floor. These are the baseline numbers used in commercial ADA design, and while a private home isn’t legally required to meet them, they’re the most reliable reference point for a layout that actually works.
Existing bathrooms rarely start with this much room, which is why an aging-in-place remodel is as much a layout project as a fixture project.
Universal Design Clearances for an Accessible Bathroom
| Element | Minimum Clearance | Comfortable Clearance |
|---|---|---|
| Doorway width | 32 inches | 36 inches |
| Wheelchair turning radius | 60 inches diameter | 60 inches diameter |
| Grab bar mounting height | 33 inches | 36 inches |
| Shower threshold height | 0.5 inches | 0 inches (curbless) |
| Clear floor space at sink | 30 x 48 inches | 36 x 48 inches |
Hitting these numbers sometimes means moving a wall instead of just swapping fixtures. That’s a harder conversation to have upfront, but it beats discovering mid-project that the new shower door won’t clear a wheelchair.
What Other Features Make a Bathroom Safer as You Age?
Comfort-height toilets, lever faucets, better lighting, and accessible storage placement round out the features that make the biggest daily difference without dominating the room’s design. Most of these are modest upgrades individually, which makes them easy to bundle into a remodel that’s already happening for other reasons.
- Comfort-height toilets, typically 17 to 19 inches versus the standard 15 inches, reduce strain during sit-to-stand movements
- Bidet seats or attachments, which reduce the reach and twisting motion that standard cleaning routines require
- Storage placed between waist and shoulder height, so nothing important requires bending or reaching overhead
- Motion-activated or well-placed lighting, especially over the toilet and inside the shower
Roughly Where Costs Land for Common Add-Ons
| Upgrade | Typical Cost Range | Notes |
|---|---|---|
| Grab bar installation | $150 to $400 per bar | Assumes blocking is already in place |
| Lever faucet upgrade | $200 to $600 per fixture | Varies by finish and brand |
| Comfort-height toilet replacement | $400 to $900 installed | Includes removal of old fixture |
| Curbless shower conversion | Covered separately | Full structural project, not a fixture swap |
Should You Plan for Aging in Place Even If You Don’t Need It Yet?
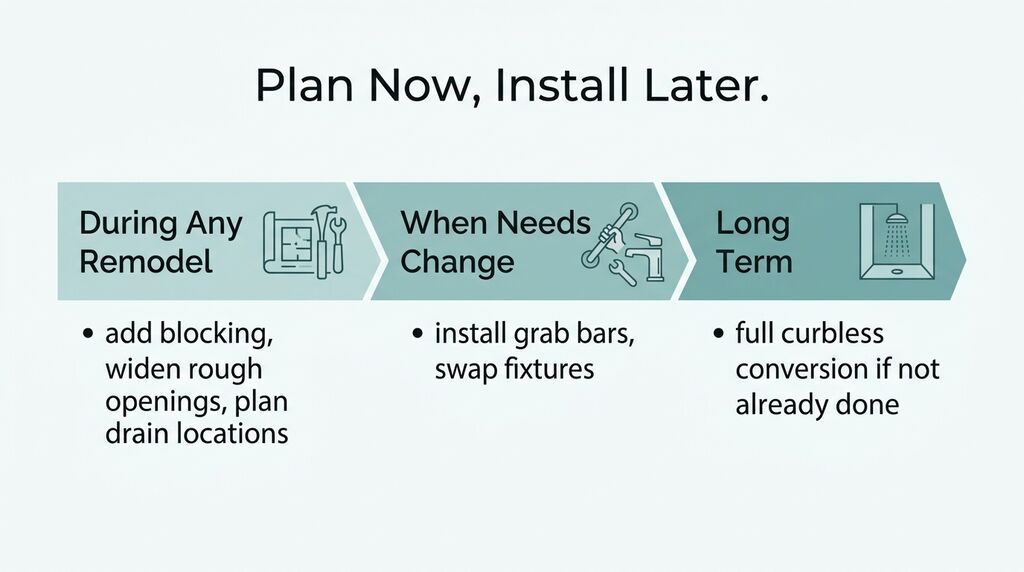
Yes, planning ahead during any bathroom remodel costs far less than retrofitting later, since blocking, wider rough openings, and drain relocation are all dramatically cheaper to build in before the walls close up. This is true whether the remodel is happening for a parent moving in next year or simply because the current bathroom is due for an update.
The National Association of Home Builders created the Certified Aging-in-Place Specialist credential specifically because this planning gap is so common. The program exists to train remodelers in exactly this kind of forward-looking design, because most homeowners don’t think to ask for it until they need it urgently.
A bathroom built with blocking already in the walls can have grab bars added in an afternoon. One without it means opening up finished tile or drywall to find a stud in the right spot, which usually turns a small job into a much bigger one.
Aging-in-place planning rarely stops at the bathroom door. Hallway widths, flooring transitions, and lighting throughout the house matter just as much. Explore Our Whole Home Renovation Services →
How to Avoid Common Mistakes in an Aging in Place Bathroom Remodel
Don’t Mount a Grab Bar Into Drywall Alone
A grab bar anchored only into drywall will fail under real weight during exactly the moment it’s needed most. Confirm blocking is in place, or being added, before any grab bar goes on the wall.
Don’t Assume a Walk-In Tub Solves the Same Problem as a Curbless Shower
Walk-in tubs require standing and waiting for the tub to fill or drain before entering or exiting safely, which introduces its own risk. For most aging-in-place projects, a curbless shower with a bench solves more problems than a walk-in tub does.
Don’t Skip the Doorway Because the Rest of the Bathroom Looks Accessible
A beautifully redone bathroom with a 24-inch doorway still isn’t accessible to anyone using a walker or wheelchair. Doorway width is one of the easiest details to overlook because it’s outside the room everyone’s focused on redesigning.
Don’t Choose Glossy Tile for the Sake of a Showroom Photo
Glossy, high-shine flooring photographs well and performs poorly the moment it gets wet. Ask specifically about the slip rating of any flooring option before committing to it.
Don’t Treat This as a Checklist Instead of a Layout Problem
Bolting a grab bar onto an existing wall and calling the job done misses the layout issues that actually cause falls, like tight turning space or a shower entry that’s still a trip hazard. The features matter less than whether they’re placed somewhere a person can actually use them.
What Should You Look for in an Aging in Place Remodeling Contractor?
Look for a design-build contractor with direct aging-in-place experience, not just a general remodeler willing to add a grab bar to the scope. The technical requirements around blocking, clearances, and drainage are specific enough that general remodeling experience alone doesn’t guarantee a contractor gets them right the first time.
A contractor holding NAHB’s CAPS credential has completed dedicated training in this exact area, which is a useful signal even if it isn’t a legal requirement for the work. Beyond credentials, ask to see a completed project with a layout similar to yours instead of relying on a portfolio of finished photos alone.
Tile and flooring choices carry more weight in an aging-in-place remodel than in a typical bathroom update. See slip-resistant and low-maintenance tile options for Triangle bathrooms. Read: Bathroom Tile Ideas →
Frequently Asked Questions about Aging in Place Bathroom Remodels
What Is the Difference Between a Curbless Shower and a Low-Curb Shower?
A curbless shower has no raised threshold at all, with the shower floor flush against the bathroom floor. A low-curb shower keeps a small lip, typically under an inch, which is easier to build in some existing layouts but still presents a minor trip point. Both require modifying the subfloor and drainage compared to a standard shower pan.
Can You Add Grab Bars Without Renovating the Whole Bathroom?
Yes, if blocking already exists behind the wall where the bar needs to go. If it doesn’t, installing a properly rated grab bar means opening the wall to add blocking first, which turns a simple installation into a small renovation on its own.
How Long Does an Aging in Place Bathroom Remodel Take?
Most aging-in-place bathroom remodels take 4 to 8 weeks once permits are in hand, depending on whether the project includes structural changes like a curbless shower conversion or a widened doorway. Projects limited to fixture swaps and grab bar additions typically finish on the faster end of that range.
Do Aging in Place Features Hurt Resale Value?
No, well-designed aging-in-place features generally support resale value rather than hurting it, especially features like curbless showers and comfort-height fixtures that read as modern upgrades to most buyers. The exception is anything that looks institutional rather than intentional, so material and design choices matter as much as the features themselves.
What Is Universal Design, and How Is It Different From Aging in Place?
Universal design is a broader approach that creates spaces usable by people of all ages and abilities from the start, while aging-in-place design specifically targets the needs of someone remaining in their home as they age. In practice, the two overlap heavily, since a wide doorway or curbless shower serves a parent with a stroller as well as it serves an aging homeowner.
A Safer Bathroom Doesn’t Have to Look Like One
The best aging-in-place bathrooms we’ve built don’t announce themselves. A curbless shower with a bench reads as a spa feature until you need it to be something more. A comfort-height toilet just feels normal. The safety is built into decisions most guests would never notice.
The actual goal is a bathroom that works for whoever uses it today, and still works for them in ten years, without a remodel in between.
Ready to talk through what an aging-in-place bathroom would look like in your home? Tell us about your space and your timeline, and we’ll walk your bathroom before we hand you a plan. Start Your Project →